WordPress has become the go-to platform for building websites, thanks to its user-friendly interface and extensive customization options. However, choosing the right hosting provider is crucial for a seamless experience. In this guide, we’ll delve into the process of installing WordPress on Bluehost, a reputable hosting service known for its reliability and optimization features.

Why Choose Bluehost for WordPress
Bluehost has earned its reputation as a top-tier hosting provider, and its compatibility with WordPress is one of the key reasons. The hosting company offers specialized features and optimizations tailored for WordPress users, ensuring a smooth and efficient website-building process.

Bluehost offers several specialized features for WordPress installation, making it a preferred hosting provider for users of the platform. Here are some of the key features:
- One-Click WordPress Installation: Bluehost simplifies the WordPress setup process with a one-click installation option. This streamlines the initial stages of creating a website, especially for users without technical expertise.
- Optimized Performance: Bluehost is optimized for WordPress, ensuring that websites hosted on their platform load quickly and perform efficiently. This optimization contributes to a positive user experience and can improve search engine rankings.
- Automatic WordPress Updates: To enhance security and functionality, Bluehost provides automatic updates for the WordPress software. This ensures that your website remains up-to-date with the latest features and patches.
- Integrated Dashboard: Bluehost’s user-friendly control panel includes a specialized dashboard for WordPress. This allows users to manage their WordPress sites seamlessly, with easy access to essential features and settings.
- Built-In Security Measures: Bluehost incorporates security features specifically designed for WordPress websites. This includes firewalls, malware detection, and other measures to protect your site from potential threats.
- Scalability and Resource Management: As your website grows, Bluehost offers scalable hosting plans to accommodate increased traffic and resource demands. This flexibility ensures that your WordPress site can handle higher volumes of visitors.
- WordPress Theme Marketplace: Bluehost provides access to a diverse marketplace of WordPress themes. Users can choose from a variety of professionally designed themes to customize the look and feel of their websites.
- Plugin Compatibility: Bluehost supports a wide range of WordPress plugins, allowing users to add various functionalities to their sites effortlessly. Whether it’s SEO optimization, social media integration, or e-commerce capabilities, Bluehost ensures compatibility with popular plugins.
- Expert Support: Bluehost has a dedicated support team with expertise in WordPress-related issues. Users can seek assistance through various channels, including live chat, ticket submission, and extensive knowledge base resources.
- Regular Backups: Bluehost offers automated backup options for WordPress sites. Regular backups are crucial for data recovery in case of unexpected events, providing users with peace of mind.
Signing up for Bluehost
To embark on your WordPress journey with Bluehost, the first step is creating an account. Head to the Bluehost website, and after a quick sign-up process, choose a hosting plan that aligns with your website’s needs.
Bluehost Sign-Up Process:
Signing up for Bluehost is a straightforward process, and here’s a step-by-step guide:
- Visit the Bluehost Website: Start by navigating to the Bluehost website using your preferred web browser.
- Select “Get Started”: On the Bluehost homepage, locate and click on the “Get Started” button. This will initiate the sign-up process.
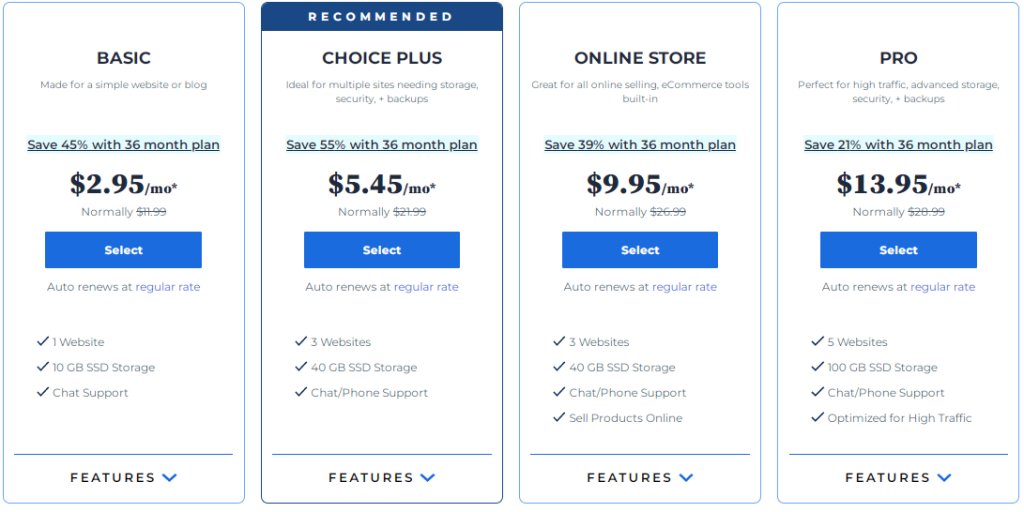
- Choose a Hosting Plan: Bluehost offers various hosting plans to cater to different needs. Select the plan that best suits your requirements. The available plans typically include Shared Hosting, VPS Hosting, and Dedicated Hosting.
- Select a Domain Name: If you already have a domain, you can enter it in the “I Have a Domain Name” section. Alternatively, you can register a new domain by entering your desired domain name in the “Create a New Domain” section.
- Create Your Bluehost Account: Fill in your account information, including your name, address, email, and other required details. Ensure that the information is accurate, as it will be used for account verification and communication.
- Choose Hosting Options: Bluehost may offer additional options during the sign-up process, such as domain privacy protection or other add-ons. Review these options and select or deselect them based on your preferences.
- Enter Payment Information: Provide your payment details to complete the sign-up process. Bluehost accepts various payment methods, including credit cards.
- Create a Password: Choose a strong password for your Bluehost account. It’s essential to use a combination of uppercase and lowercase letters, numbers, and special characters to enhance security.
- Read and Agree to Terms: Review Bluehost’s terms of service and privacy policy. Once you’ve read and understood them, check the box to indicate your agreement.
- Complete the Sign-Up: Click on the “Submit” or “Create Account” button to finalize the sign-up process. Bluehost will then send a confirmation email to the address you provided.
- Verify Your Email: Check your email for a message from Bluehost and follow the instructions to verify your email address. This step is crucial to activate your Bluehost account.

Congratulations! You’ve successfully signed up for Bluehost.
Bluehost Hosting Plans:
Bluehost offers various hosting plans tailored to different needs.
Domain Registration
Once you’ve set up your Bluehost account, it’s time to register a domain. Selecting the right domain name is crucial, so take the time to brainstorm something relevant and memorable.
Bluehost Domain Registration Process:
Registering a domain with Bluehost is a simple and user-friendly process. Here’s a step-by-step guide:

- Visit the Bluehost Website: Start by navigating to the Bluehost website using your web browser.
- Login or Sign Up: If you already have a Bluehost account, log in using your credentials. If not, you’ll need to sign up by providing the necessary information.
- Access the Control Panel: Once logged in, access the Bluehost control panel (cPanel). This is where you’ll find various tools and options for managing your hosting account.
- Navigate to the Domain Section: Look for the section related to domains within the cPanel. Bluehost usually has a separate section for domain management.
- Choose “Register a New Domain”: Click on the option that says “Register a New Domain” or a similar phrase. This will initiate the domain registration process.
- Enter Your Desired Domain: In the provided field, enter the domain name you want to register. Bluehost will check the availability of the domain. If the domain is available, you can proceed to the next step. If it’s not available, you might need to try variations or choose a different domain.
- Select Domain Extension: Choose the desired domain extension (e.g., .com, .net, .org). Bluehost offers a variety of domain extensions, so pick the one that best suits your website.
- Configure Domain Settings: Bluehost will then ask you to configure some settings for your domain. This may include options for domain privacy protection, which keeps your personal information private in the domain registry database. Review and select the options that suit your preferences.
- Add to Cart: Once you’ve configured your domain settings, add the domain to your cart. Bluehost may also offer additional services or features during this step. Review these options and add any that you find necessary.
- Review Your Order: Before proceeding to checkout, review your order to ensure that the domain name and any additional services are correct. You’ll see the total cost and can make adjustments if needed.
- Complete the Purchase: Proceed to the checkout and enter your payment information to complete the domain registration process. Bluehost accepts various payment methods, including credit cards.
- Confirmation Email: After the successful registration, Bluehost will send a confirmation email to the address associated with your account. This email will contain important information about your domain registration.
Congratulations! You’ve successfully registered a domain with Bluehost. Keep in mind that it may take some time for the domain registration to propagate across the internet, and your domain will be ready for use once this process is complete.
Bluehost Control Panel

Navigating the Bluehost dashboard is intuitive. Familiarize yourself with the control panel, where you’ll find essential features like file management, email setup, and one-click installations.
The Bluehost control panel, often referred to as cPanel (Control Panel), is a user-friendly interface that allows you to manage various aspects of your hosting account and website. Here’s a detailed overview of the Bluehost control panel:
- Login: To access the Bluehost control panel, log in to your Bluehost account using your username and password. Once logged in, you’ll land on the cPanel dashboard.
- Dashboard: The cPanel dashboard is the central hub where you can quickly access key features and tools. It provides an at-a-glance overview of your account, including resource usage, domain information, and links to commonly used functions.
- File Management:
- File Manager: This tool allows you to manage files on your hosting account. You can upload, download, delete, and organize files directly from the control panel.
- Domains:
- Domain Manager: Here, you can view and manage your registered domains. This includes options to add new domains, configure domain settings, and set up subdomains.
- Email:
- Email Accounts: Create and manage email accounts associated with your domain. You can set up email addresses, configure email clients, and manage email settings.
- Database Management:
- MySQL Databases: If your website relies on databases, this section allows you to create, modify, and manage MySQL databases. You can also manage database users and permissions.
- Website Builders:
- WordPress Tools: Bluehost offers tools specifically for managing WordPress websites. This includes the ability to install WordPress, manage themes and plugins, and access performance analytics.
- Security:
- SSL/TLS Manager: Secure your website with SSL certificates using this tool. Bluehost provides a free SSL certificate, and this section allows you to manage and configure it.
- Security Center: Access features like two-factor authentication and password protection to enhance the security of your hosting account.
- Marketing and SEO:
- SEO Tools: Bluehost provides tools to optimize your website for search engines. This includes tools for submitting sitemaps and managing SEO settings.
- Metrics:
- Awstats and Webalizer: These tools provide detailed statistics about your website’s traffic, including visitor demographics, popular pages, and more.
- Software and Services:
- PHP Configuration: Customize PHP settings for your website.
- RubyGems and Ruby on Rails: If you’re using Ruby, you can manage gems and configure Ruby on Rails settings.
- Advanced Settings:
- Cron Jobs: Schedule automated tasks to run at specific intervals.
- Advanced Zone Editor: Modify DNS records for your domain.
- Preferences:
- Change Password: Update your Bluehost account password.
- Contact Information: Manage the contact details associated with your hosting account.
- Support and Help:
- Knowledge Base and Help Center: Access helpful articles and resources to troubleshoot issues or find information about Bluehost services.
- Contact Support: If you need assistance, use the support options to get in touch with Bluehost’s customer support team.
- Logout:
- Always log out of your control panel when you’ve finished managing your account to ensure security.
The Bluehost control panel is designed to be user-friendly, making it easy for both beginners and experienced users to manage their hosting accounts and websites effectively.
Installing WordPress
Bluehost makes installing WordPress a breeze. Head to the control panel, find the one-click installation option, and follow the prompts. During installation, customize your settings, including your site’s title and description.

Bluehost simplifies the process of installing WordPress through its one-click installation feature. This streamlined method allows you to set up a WordPress website quickly and efficiently. Here’s a step-by-step guide:
- Login to Bluehost: Start by logging in to your Bluehost account using your username and password. Once logged in, you’ll find yourself in the Bluehost control panel (cPanel).
- Navigate to the Website Section: Within the cPanel, locate the “Website” or “Website Builders” section. Bluehost often places the WordPress tools here.
- Click on “Install WordPress”: Look for the option that says “Install WordPress” or “One-Click Installs.” Click on it to initiate the WordPress installation process.
- Choose Your Domain: If you have multiple domains associated with your Bluehost account, select the domain where you want to install WordPress. If you’re setting up WordPress for the main domain, leave this field blank.
- Configure Settings:
- Site Name or Title: Enter the name of your website. You can change this later within the WordPress dashboard.
- Admin Username: Choose a username for your WordPress admin account.
- Admin Password: Create a strong password for the admin account.
- Admin Email: Provide an email address associated with the admin account.
- Advanced Options (Optional): Bluehost offers advanced options for customization:
- Site Language: Choose the language for your WordPress site.
- Enable Multisite (WPMU): This is for creating a network of WordPress sites, typically not needed for a standard website.
- Choose Plugins (Optional): Bluehost may offer optional plugins during the installation process. You can select or deselect these based on your preferences. Common plugins include those for security and performance.
- Read and Agree to Terms: Review the terms and conditions, and if you agree, click on the “Install” or “Submit” button to proceed with the installation.
- Wait for Installation: Bluehost will now automatically install WordPress on your selected domain. The process may take a few minutes. Once completed, you’ll see a confirmation message.
- Access Your WordPress Dashboard: Bluehost will provide a link to your WordPress dashboard. Click on the link, or you can access it directly by typing your domain followed by “/wp-admin” (e.g., yourdomain.com/wp-admin). Use the admin username and password you set during the installation to log in.
Congratulations! You’ve successfully installed WordPress on Bluehost using the one-click installation process. From here, you can customize your site, choose a theme, and start creating content using the user-friendly WordPress dashboard.
Theme Selection
With WordPress installed, explore the theme marketplace. Choose a theme that complements your website’s purpose, and don’t forget to consider responsiveness and user experience.
Customizing Your WordPress Site
Personalize your site by adding logos, choosing colors, and selecting fonts. Enhance functionality by installing essential plugins, such as those for SEO optimization, security, and social media integration.
Creating Your First Post
Utilize the WordPress editor to craft your first post. Keep it engaging, and optimize it for search engines by incorporating relevant keywords and meta tags.
SEO Best Practices
Implement on-page SEO techniques to boost your site’s visibility. Utilize WordPress plugins like Yoast SEO to streamline the optimization process.
Securing Your WordPress Installation on Bluehost
Bluehost provides security features to protect your website from potential threats. Enable these features and follow best practices to safeguard your WordPress installation.
Regular Backups
Back up your WordPress site regularly to prevent data loss. Bluehost offers automated backup options; ensure they are configured to meet your needs.
Monitoring Site Performance
Use Bluehost’s performance analytics tools to monitor your site’s speed and responsiveness. Optimize images and content to enhance user experience.
Scaling Your Website
As your website grows, consider upgrading your Bluehost hosting plan to accommodate increased traffic. Proactively manage resources to ensure optimal performance.
Troubleshooting Common Issues
Address common WordPress and Bluehost-related problems, such as plugin conflicts or downtime, by referring to support documentation or reaching out to Bluehost’s customer support.
Conclusion
Installing WordPress on Bluehost is a straightforward process that sets the foundation for a successful website. The combination of WordPress’s flexibility and Bluehost’s reliability creates an ideal environment for both beginners and experienced users. Follow the outlined steps, explore customization options, and leverage the features provided by Bluehost to ensure your WordPress site thrives.
FAQs
- Is Bluehost the only hosting provider for WordPress?
- While there are many hosting options, Bluehost is highly recommended for its WordPress optimization features.
- Can I change my domain name after registering with Bluehost?
- Yes, but it’s recommended to choose a memorable and relevant domain name from the start.
- How often should I back up my WordPress site on Bluehost?
- Regular backups, at least once a week, are advisable to prevent data loss.
- Are there any free themes available for WordPress on Bluehost?
- Yes, Bluehost offers a selection of free themes within the WordPress theme marketplace.
- What should I do if I encounter issues during the WordPress installation process?
- Refer to Bluehost’s support documentation or contact their customer support for assistance.